Retro Tread Installation Instructions
Tools needed:
- Skill saw
- Hammer
- Chisel
- Finish nails
- Construction adhesive
Time required:
10-15 minutes per tread
Steps:
- Remove any existing carpet, vinyl or other covering, exposing the raw unfinished backer tread.
- With a skill saw or jigsaw, cut the bull nose of the tread back flush with the existing riser or slightly behind the riser (roughly 1½" from the front of the nose). Using a chisel, clean off the edges next to the skirt board.
- Cut to length and finish nail the ¼" RetroFit® riser. Construction adhesive is recommended. Pre-drilling nail holes is also recommended to keep the riser from splitting.
- Cut to length and finish nail the RetroFit® tread. Again, we recommend using construction adhesive between the existing tread and the RetroFit® tread.
- Cut to length and finish nail the ¾" x ½" RetroFit® cove moulding to conceal any small gaps between the RetroFit® bull nose and RetroFit®¼" riser.
Specs:
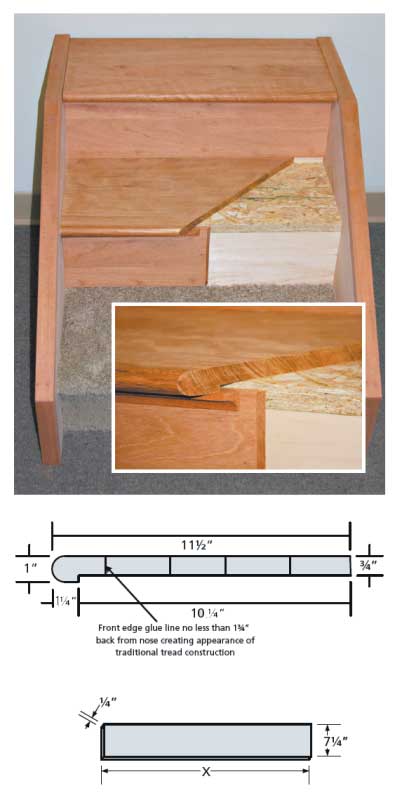
RetroFit® stair treads from stair-treads.com is a solid edge-glued wood tread. This is not a veneered or engineered product. The bullnose has a solid 1¾" to 2" wide stave to give the tread the appearance of conventional tread construction rather than an added piece. Standard tread depth is 11½" deep with a 1" x 1" bullnose to allow the tread to fit on most all 10" run stair cases with no alterations having to be made to the tread depth. Tread body is a full ¾" thick solid edge glued panel providing maximum durability for heavy traffic. Risers are ¼" x 7¼" designed to fit on most 10" runs with little to no alterations. Risers are either a solid one piece or edge glued product of solid wood construction. Standard ¾" x ½" cove is utilized to trim out the finished stair case and hide any unsightly gaps between the tread and riser.
RetroFit is a trademark of King Products and Services, Inc. Installation instructions provided courtesy of King Products, Inc
You may also want to read the magazine article from Extreme How-To, "How to Install Prefinished Stair Treads"
Or watch a video How to install prefinished stair treads
Recommended Adhesives
We have partnered with Liquid Nails® and PL® to bring you a list of adhesives that we do and do not recommend. We strongly advise you to read the recommended adhesives page prior to installing your new stair treads. An adhesive with a high moisture content can ruin a set of wood stairs and is not covered by our warranty!


Log In